

 If you want to learn how to take great eBay photos, stop for a moment and browse for just about any product on Amazon. You’ll notice a very distinctive style of image. A softly lit product in an infinite sea of white. It’s a standard and expectation that Amazon has set. Any product sold on Amazon must be presented with this image style. It’s a nice, clean and minimalistic style that removes distractions and focuses on the product. It conveys a sense of professionalism and standardized quality.
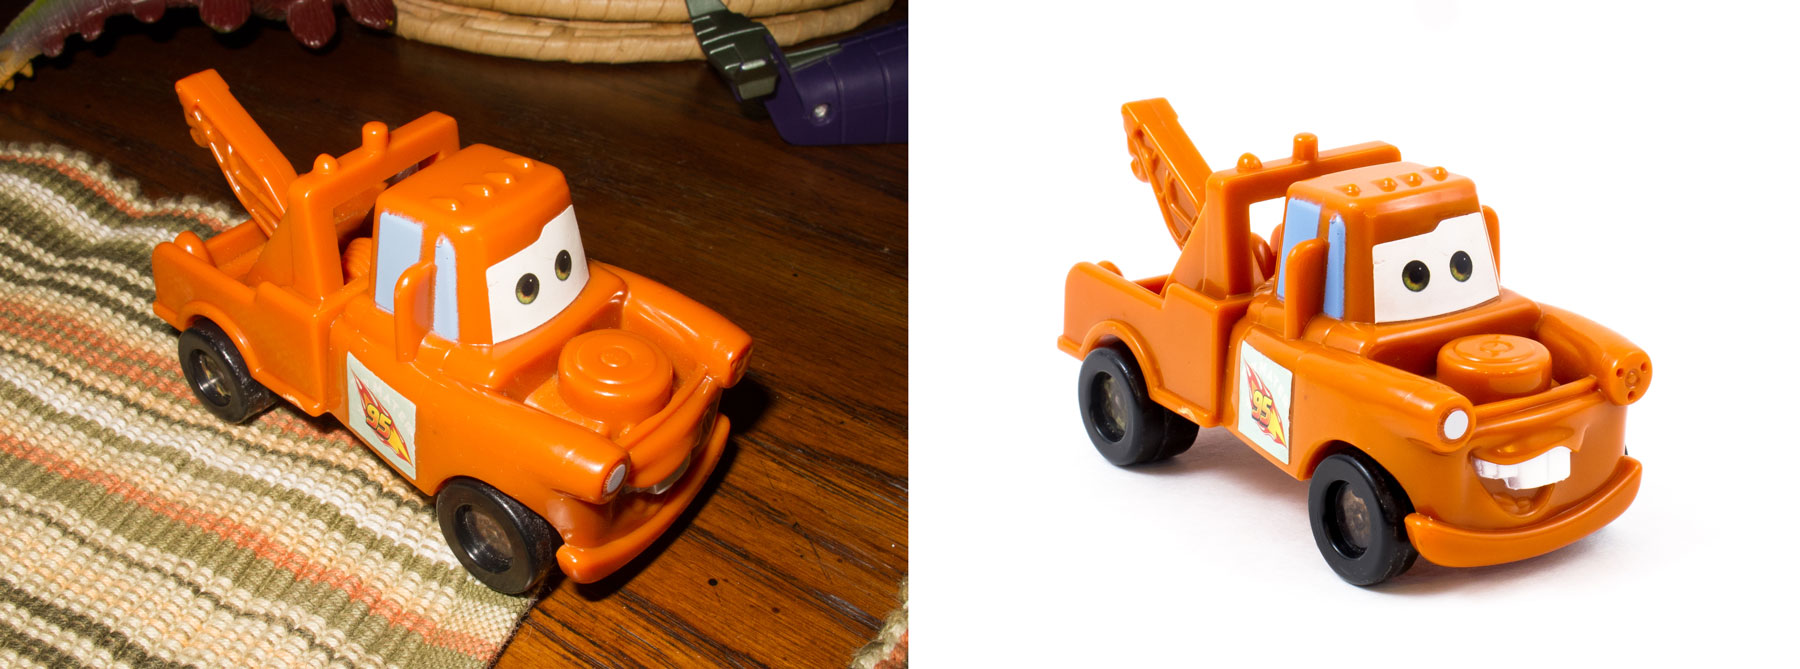
Now take a look on eBay and you’ll notice that not all items are presented in that clean professional style. I did a search on eBay for “toys” and found many less-than-stellar images. Images are key to selling on eBay. The images on eBay which have that clean “Amazon” style are more attractive and could likely demand a higher selling price (all other things being equal). People subconsciously associate the quality of the product with the quality of the image. It makes sense. If the seller took the time to create a great image, it might be assumed that the seller also cared for the product and would behave professionally throughout the transaction. Not only that, the items just look cool!
There are several factors that give photos that “look”:
- A clean pure-white, “infinity” clutter-free background
- Soft (no harsh shadows), color balanced, even lighting
- Good, balanced coloring and contrast
- Good composition
So, how do you take great eBay photos? It’s not as hard as you might think. All you need are some relatively inexpensive items from your local craft and home improvement stores. With a bit of knowledge and practice, you’ll be off and selling your items like a pro! Let’s go over some of the items you’ll need:
- A camera (a point and shoot or higher should do just fine)
- A small tripod
- A large translucent plastic storage bin
- 2 medium size heat lamps
- 2 high wattage, daylight balanced bulbs (I used compact fluorescents)
- Craft tissue paper
- White poster paper
- Tape
Now you’ve got a vision of what the final image should look like and you’ve got all the ingredients you’ll need. Next take a look at the video below to learn the secret sauce and how to mix it all together to get the result you’ve been looking for: great eBay photos!
Do you have any other tips on how to get eBay / Amazon looking photos? As always, your comment are welcome and encouraged. Leave yours below!
I just started selling on eBay and have been exploring ways to take good photos to post with my items. This was so helpful! Thanks 🙂
Glad I could be of help. Hopefully good pictures will help you with your sales!
Been selling e bay for years but some photo tips here are new and exciting for me. Makes for more productive time usage and eliminates the excess trial and error shots. Looking forward to the large object photography video. Thanks.
One thing that really does help is to get all of your products ready and shoot at one time. Saves time in the long run.
Really nice high impact shots from a great DIY project. Much better than the results I’ve gotten before trying to use stiff white posterboards to make a box. You should mention the added benefit that the equipment including the lamps easily stores inside the translucent box so it will all stay together and ready for a quick setup next time. Thanks!
Good point about storing all the stuff in the box. Yup, that’s just the way we have it stored in our garage waiting for the next product shoot.
This video is extraordinarily helpful, thank you. How does your home made “photographic tent” if that is the correct terminology, compare with a similar package purchased from a photographic store?
A photo tent is another option. They can work well. Some are better in quality and others … not so much. I like the concept and feel of putting something together myself.
Simple inexpensive way to get great results. Thanks!
Thanks for the great tips and instruction in this video. My ebay, craigslist, etc pictures are so much better using your techniques. Much appreciated!
You’re very welcome! Glad that your photos are coming out nicely!