

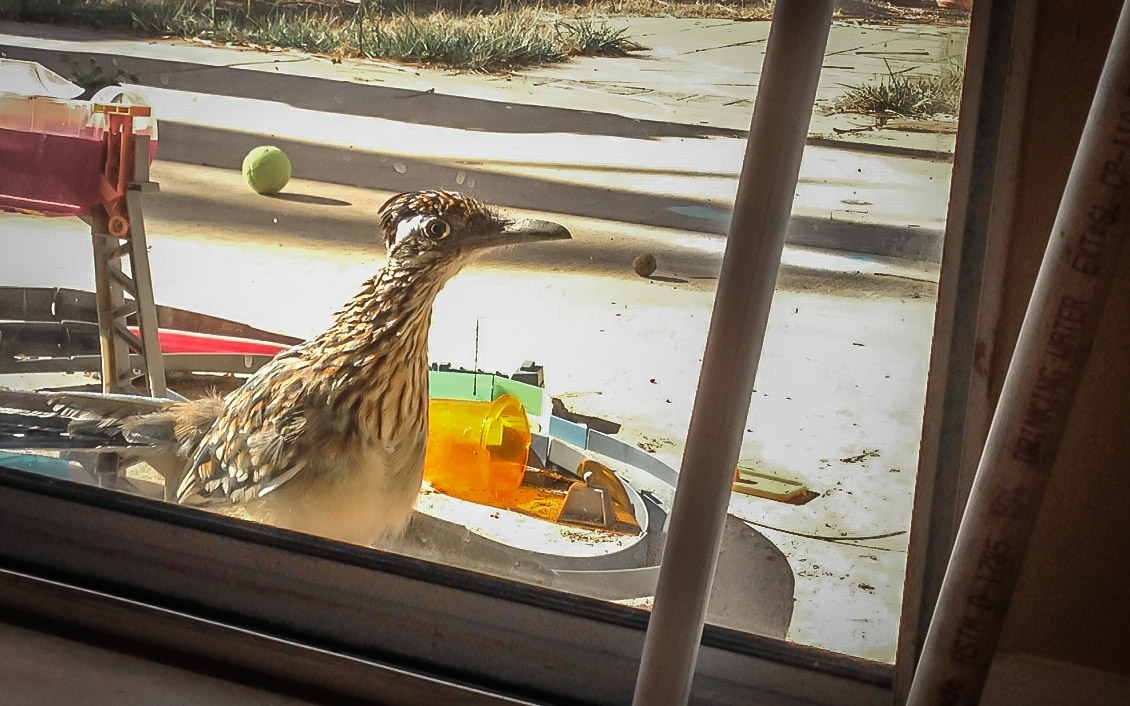
I love to shoot with my smartphone and I think most people do. Sure it doesn’t have some of the capabilities of my compact camera let alone my professional SLR, but it’s just SO convenient that it often trumps their advantages. First off it’s small and always there. I can’t say the same for my SLR. My son just put underwear on his head and pretends to be a pirate? My SLR is in the closet, but my smartphone is handy! I’m having lunch and a road runner is in my backyard? (check out the image below this article) My compact is tucked away in my backpack, but my smartphone is next to me! As a pro photographer, I’m asked to shoot a high profile wedding of a wealthy and powerful entrepreneur? … Okay seriously what fluff-head would ever use their smartphone to shoot a wedding? That’s just silly, it’s the wrong tool. BUT for the underwear-headed pirate and lunchtime roadrunner, it’s the perfect tool. Not only was I able to capture the spontaneous picture at a moment’s notice, I’m able to edit it and send it to friends within a few minutes without having to go through my home computer as an intermediate step.
On upcoming articles, I’ll be writing about apps and other resources to edit, modify and share your images. But for today, I’d like to “focus” on the capture process. How to take great pictures with a smartphone.
Disclaimer: I own an iPhone. (about 40% of your are thinking YAYY! and the other 60% are mistakenly beginning to lose interest in this article … don’t) I don’t have anything against other smartphones. I can’t afford more than one smartphone. If anyone wants to provide me with additional smartphones, and a funding source so that I can evaluate apps and features, I’d be happy to do so. Until then, regretfully, I can only personally comment on certain apps and features that I have experienced on my iPhone. The good news is that MANY techniques and tips that I will share with you are smartphone agnostic (i.e. it won’t matter what kind of smartphone you have, for example: telling not to shake your camera for clearer pictures, universally applies).
Get light on your subject.
Phone cameras are notorious for needing a lot of light for good pictures. They have teeny lenses and teeny sensors. Remember all that smallness and convenience you appreciated so much? Well, small cameras generally have small components and in the case of smartphones teeny tiny lenses and sensors need lotsa light. So what to do? Get as much light on your subjects as you can. If you’ve got people squinting in the sun, rotate them just enough to get the light out of their eyes or give ‘em all sunglasses. Another trick outdoors is to put people in open shade. The background might blow out and be bright, but faces should come out OK. What if you’re outside and you need just a little more light. Try a reflector. Any large white surface will do. You can also buy one of these: Circular Reflectors (Collapsible Circular Reflector Disc). It collapses down so you can stow it in your backpack, but unfolds to a nice 12 inch circle for a great reflective surface. Especially nice to use on things like flowers, food and other close ups where a little more light on just the right side could save the picture. What about a dimmer, indoor situation? You can try to turn on as many lights as you can (without blowing a circuit) or pop the smartphone flash. The trouble is, the smartphone flash is … you guessed it: teeny, which = not very powerful. Here’s a tip if you have access to one of those ridiculously bright flashlights, don’t point it at your subject, point it at the ceiling. Bounce the light off of a white ceiling and you’ll get a soft even light on their faces. You might also try these gadgets to give you just a bit more light than your onboard smartphone flash. $20 LED smartphone “flash” (LED Light Portable Pocket Spotlight for iPhone) attaches to your headphone jack: Or try this $7 LED worklight. (LED Super Bright-led Compact Worklight)
Cut the clutter.
Make the subject the subject. Get rid of background distractions. Smartphones have a relatively wide angle lens. This is good to take in more of a scene, but not so good if you’re trying to isolate your subject matter unless you get nice and close. Move with your feet to get close. Not many smartphone have an actual zoom lens. Most of them use “digital zoom” or fake zoom to get closer by zooming. What you’re really doing with digital zoom is cropping the picture, which you can always do later in post production. Using digital zoom can reduce sharpness and cause a lot of grain or noise in the photo. Instead use heel-toe zoom and use your feet to get closer.
Hold it still.
Don’t hold the camera out at arms length. Hold it as close to your body as you can. Squeeze your ribs with your elbows. Get your feet in a good stable stance. Don’t walk around. Lean up against a pole / tree. Rest the phone on something solid.
Tap to select what you want to focus on and adjust exposure.
The image on your smartphone screen can magically transform from dark and blurry to properly exposed and focused with one tap. Tap on a person’s face or the close up of the leaf and the phone should adjust your focus and exposure accordingly. Tap and hold to lock in the focus and exposure. AE is your Auto Exposure (how bright or dim the picture is going to turn out) and AF is your Auto Focus. When you press and hold, it “locks” it on that setting even if you move the camera a bit.On most smartphones both the focus and exposure are locked on the same point. In order to separate them (i.e. focus on one spot and expose for a different spot, something I do OFTEN) you’ll need an app. My favorites are Procamera by Cocologics, Camera+ by tap tap tap and Pureshot by Michael Hardaker. I also really like VSCO Cam which is available on both iOS and Android.
Don’t tap the screen to take the photo.
Many smartphones actually take the photo on RELEASE of the button (as your finger comes off the screen) not the press. Never tap tap tap! Why would you tap tap? You’re just shaking the camera if you tap! Gently press instead. If you can, set it to continuous shooting and fire off several shots, all the while, hold it still!
Take many shots.
It’s digital! Shoot many, delete the junk, process and post the keepers!
So … Compose your shots well, pay attention to the light, cut the clutter, hold the phone steady, tap to focus, gently press to take the shot, take a bunch of shots and post the beauties online for all your friends to admire!
Thanks for the useful tips Sonny.
Great article, Sonny. After reading this, I actually played around with my iPhone camera (which I previously considered a “toy” camera) and found some neat features with the ability to tap focus and even tap & hold to lock in AF/AE. Good stuff.
When you press and hold the screen in the built-in Camera app on iOS and then release your finger, the display shows “AE/AF Lock”. What does that mean? What does that do?
PS. Neither of your links for “$20 LED smartphone “flash” attaches to your headphone jack: Or try this $7 LED worklight.” appear to be available on Amazon.com anymore. Both links brought me to search pages with no matches.
Great question. I’ll also revise my article and include the explanation in there. AE is your Auto Exposure (how bright or dim the picture is going to turn out) and AF is your Auto Focus. When you press and hold, it “locks” it on that setting even if you move the camera a bit.
On the Amazon link problem. I think it’s because I chose them from the US stores. I’ll revise the article and put the names of the items so you can search from them manually in the Amazon store in your country. My apologies about that!
The camera apps that you mentioned in this article seem like they’d be very useful. Its nice that two of them only require iOS 6. Thanks!
Sonny, this is a really useful article. I’ve always taken lots of photos with my phone & am looking forward to taking much better ones using your tips.
Great feedback for smartphone camera shooting. Many of the things that I tell me wife, who by her own admission is a horrible picture taker and thus never bothered to take them. But I’ve been encouraging her to take more, and practice, and she’s improving based on some of the basics.
A couple comments that I’ll make, and that’s the fact that many of the smart phones today support specific features that when used can generate much better pictures.
HDR mode for example, which snaps multiple pictures at different exposures and combines the results for a much better picture. Great for poor lighting conditions (i.e. too much light on a bright day reflecting off a pool, to street lamps at dusk.)
Here’s an example of HDR results. A picture I took of Jackson Square not long after the sun had set. Yeah, it’s not the best of images, but when compared to non-HDR it shows a how lot more. And even better than adjusting the exposure level manually alone which would have ended up washing out sky and buildings.
HDR
https://lh6.googleusercontent.com/-ysPlehHEYKo/UZ-B0JI2emI/AAAAAAAAM40/uy4ajAxjw-8/w1278-h719-no/20130522_201328_Richtone%28HDR%29.jpg
Auto
https://lh6.googleusercontent.com/-W2rhcgpYgTo/UZ-BtUGrv9I/AAAAAAAAM4c/Tl3-DF8AYME/w1278-h719-no/20130522_201308.jpg
Loved the article, Sonny! For me, when I’m walking around on our regional trails, I usually only have the smartphone with me. That’s going to be changing. But the most frustration I’ve had is trying to take pictures of birds without disturbing them, which is very difficult when you can’t zoom in on a smartphone. That said, I’ve gotten a few good shots of turkeys and things.
I believe I’m too much in a hurry when I try to take smartphone pictures. I’ll need to work more on taking my time and hoping that my subject doesn’t move too quickly. 🙂
Thanks for the great tips. On our last vacation, we decided to take all our photos with our smartphone. Some were good, a few were great, and many were, well, deleted. Thanks to this article, I expect our future vacation pics will all be keepers.
I’m going to try Camera+… I hadn’t really thought of apps as good for anything but adding cheesy effects. You set me straight: being able to focus on one spot and expose for another is very useful when you don’t have manual control.
Very cool! Yes, (almost) everyone has a smartphone with them at all times so these are quick and useful tips!
Great tips! I take all my pictures with my smart phone. 🙂
I have seen and admired your beautiful pictures and honestly I never thought I would be able to take a photo that I would truly admire. However, after reading several of your articles and applying the recommended tips, I find that my picture taking has improved tremendously. I am no where your level of expertise but I have improved. Thank you for creating this wonderful educational website.
I’ve used a digital camera now for 10-15 years at my work. You’re right, in a pinch, I’ve used my phone camera many times when my “real” camera wasn’t handy. Phone camera pictures have always been marginal, but it’s always fun to discover what your phone camera can do better. Thanks for the tips.
Did not know about the tap vs. release feature. Thanks for the tip.
Thanks for the smartphone camera tips. I have an IPhone and need to take more photos with it.
Great and helpful advise Sonny… I more often than not have my phone at easier access when traveling . And capture a moment with my iPhone… Thanks for the helpful tips.
Another iPhone trick that can be filed under “how did I not know that?”: you can take pictures with the volume buttons. This is helpful for a few reasons. First, you can apply the “squeeze, don’t tap” advice much easier. Don’t push the button like a doorbell, squeeze it like a toothpaste tube. Second, if you hold the volume button down (either button works) the iPhone automatically takes a burst of photos. Pic your fave and dump the rest. Hope these helped!
I was interested to learn that rather than hold the phone at arm’s length it’s best to put elbows against ribs to keep steady. I agree that the convenience of the phone very often makes it the camera of choice.